A hairline crack in a basement wall can seem harmless, right up until the day water squirts through it in a spring thaw. Many homeowners only start asking how to waterproof a concrete foundation after they smell musty odours or see boxes ruined on the floor. By that point, water has already crept through the concrete, and the damage has started.
In the Fredericton area, concrete foundations face a tough mix of freeze–thaw cycles, heavy rain, and long periods of snowmelt. Water in the soil presses against basement walls, then freezes, then thaws again. That repeated pressure opens small gaps, lets more water in, and can weaken the structure over time. Left alone, it leads to mould, flaking concrete, and even bowing walls.
Waterproofing is not an upgrade for later. For most homes, it is a basic part of protecting structure, indoor air quality, and property value. New builds need proper exterior foundation waterproofing from day one. Older homes often need a repair plan that can include exterior work, interior foundation waterproofing, drainage upgrades, and targeted foundation crack repair.
This guide walks through what matters most. It explains the difference between waterproofing and dampproofing, covers the main basement waterproofing methods, shows how professionals install modern systems step by step, and points out when a DIY patch is not enough. With more than 15 years in foundation repair around Fredericton, Atlantic Brick and Stone uses these same methods every day, so by the end of this guide, it will be clear what your foundation needs and what to ask for when you call in help.
When people first look into how to waterproof a concrete foundation, they often run into the words waterproofing and dampproofing and assume they are the same. They are not. Each one handles a different problem, and choosing the wrong one can leave a basement wet even after work is done.
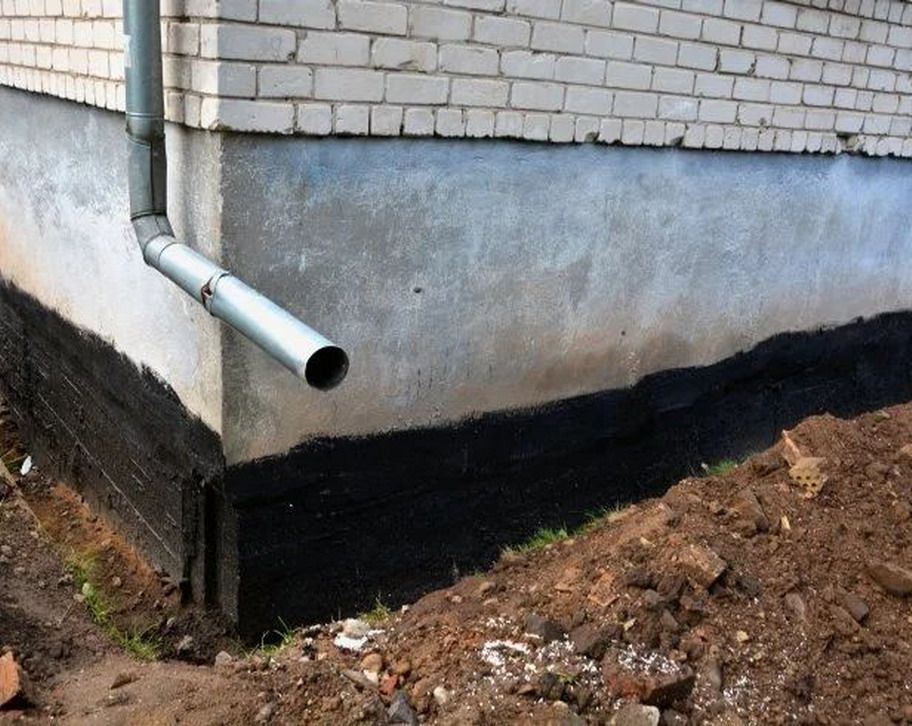
Dampproofing is a thin coating, usually asphalt based, brushed or sprayed onto the outside of a wall. It slows down moisture vapour that moves through soil and concrete. It works reasonably well in dry soil with good natural drainage. What it does not handle is actual water pressure that builds up against the wall after heavy rain or snowmelt.
Waterproofing is a thicker barrier system that is designed to resist water under pressure. It often uses a self-adhered or liquid membrane, plus drainage components, to stop water from pushing through concrete or block. When water fills the soil around a house, it creates hydrostatic pressure, which is the force that pushes water into every small opening. Proper waterproofing is built to withstand that pressure over many years.
In low-risk areas with sandy soil and very shallow basements, dampproofing and good grading may be enough. In Fredericton and nearby communities, with finished basements, clay soils in many neighbourhoods, and long wet seasons, full waterproofing is the safer choice. Positive-side waterproofing, done on the exterior face of the wall, is the current standard for long-term basement moisture prevention.
When learning how to waterproof a concrete foundation, it helps to picture where the water actually is. The source is outside in the soil, so the most effective defence goes on the outside face of the wall. This is called positive-side waterproofing, because it is applied on the side that sees water pressure.
An exterior waterproofing system includes a membrane on the wall and drainage at the footing. Hydrostatic pressure in the soil pushes that membrane firmly against the concrete. Instead of fighting the pressure, the system uses it to keep the barrier tight. The concrete stays dry, reinforcing steel inside the wall stays protected from rust, and freeze–thaw cycles have less effect.
Interior methods work on the negative side, after water has already passed through the wall. Interior drains and sump pumps do a good job of collecting and redirecting that water, but the concrete still gets wet. Over many years, that can lead to spalling, crumbling mortar, and damage to finishes such as drywall and flooring.
Exterior foundation waterproofing does involve excavation, so it is more involved at the start. The payoff is that it addresses the source of the problem instead of just catching water inside. Atlantic Brick and Stone designs both exterior and interior systems and can recommend the right combination for each property after a diagnostic inspection.
There is more than one way to waterproof a concrete wall, but modern systems share a few key parts. A membrane blocks water at the wall, protection layers shield that membrane, and drainage components move water away. Knowing these parts helps when comparing quotes or discussing waterproofing membrane installation with a contractor.
Sheet-applied membranes are common on poured concrete and block foundations around Fredericton. These products are usually made from rubberized asphalt or modified bitumen, bonded to a plastic film. Installers first apply a primer, then roll the self-adhered sheets onto the wall so they overlap and form a continuous skin.
Factory control gives each sheet a consistent thickness, which means reliable performance over the whole wall. These membranes bridge small cracks, stand up to the impact of backfilling, and handle slight movement in the structure. When installed correctly, they help waterproof basement block walls, poured walls, and even short foundation sections under additions.
Liquid-applied membranes are sprayed, rolled, or trowelled onto the foundation. After curing, they form a seamless, rubber-like coating that sticks tightly to the wall. Because there are no seams, there are fewer weak spots where water might sneak in.
These membranes are especially useful on foundations with lots of corners, curves, or pipe penetrations. The liquid follows every contour and hardens into a smooth, continuous layer. The flexibility of the cured material lets it stretch slightly if hairline cracks form later, which helps keep a waterproof concrete wall dry over time.
Dimpled drainage boards look like thick plastic sheets covered in small bumps. Contractors install them over the waterproofing membrane, with the dimples facing the wall. This creates a slim air space between the wall and the soil.
That air space does two important things at once. It gives water an easy path down to the footing drain, which reduces pressure on the wall. It also shields the membrane from sharp stones and chunks of clay when the trench is backfilled. On many projects, rigid insulation panels are added as an extra protection layer, improving energy performance while helping to protect a waterproof concrete block foundation.
A good membrane is only half the story. A foundation drain system at footing level collects water and sends it away from the house. This system usually uses a 100-millimetre perforated pipe laid beside the footing, surrounded by clean gravel and wrapped in a geotextile fabric.
Water that runs down the drainage board enters the gravel, then seeps into the pipe. From there, it flows to a sump pump or to a safe discharge point. Atlantic Brick and Stone inspects existing drains during exterior work and repairs or replaces damaged pipe so the new waterproof block foundation system has proper support.
A professional crew follows a clear process when they waterproof a cinder block foundation or a poured wall. The steps matter as much as the materials, because each layer works only if the one below it is prepared correctly. Here is how Atlantic Brick and Stone approaches a full exterior foundation waterproofing project.
Work starts with excavation around the outside of the foundation down to the base of the footing. On most homes, a mini-excavator has enough reach while still fitting between houses and driveways. Underground utilities are marked and avoided, and access plans are made for tight rear yards. Plants, decks, and walkways may be temporarily removed or protected. Soil type and trench depth are checked often so the walls of the excavation stay stable and safe.
Once the wall is exposed, the crew removes all loose dirt, old coatings, and efflorescence with pressure washing and wire brushing. A clean surface lets the concrete foundation sealer and membrane bond properly. With the wall bare, the crew checks every face for cracks, honeycombed areas, flaking patches, and old form-tie holes. On some projects, Atlantic Brick and Stone uses thermal imaging to spot hidden damp zones that point to concealed defects or active leaks.
Before any waterproofing membrane goes on, the wall itself has to be sound:
On a waterproof basement block wall, loose or missing mortar joints are ground out and repointed so the wall is stable.
All repair materials are allowed to cure as directed before the next step.
Primer helps the self-adhered membrane stick to the wall and stay bonded over time. Installers roll or brush an even coat from the top of the footing up to just below finished grade. Standard concrete usually receives a solvent-based primer, while insulated concrete form foundations get a water-based version that will not damage foam. The crew waits until the primer is dry to the touch yet still slightly tacky, which shows it is ready for membrane.
Detail work at corners and joints comes first. An elastomeric bead goes along the joint where the wall meets the footing, sealing that corner. Strips of membrane follow, running up the wall and across the footing to reinforce this busy area. Inside corners receive dedicated pieces, carefully pressed in so there are no gaps. Outside corners usually get two overlapping layers to handle backfill pressure.
After that, the main waterproofing membrane installation begins. Sheets are hung vertically from the top of the wall, with the backing film peeled away bit by bit while the installer presses and rolls the sheet into place. Each sheet overlaps the previous one by at least about eight centimetres, following printed guide marks. The membrane extends over the top of earlier corner strips and down over most of the footing. Rollers press out air pockets so there are no hidden bubbles where water could track. A final visual check looks at every seam, edge, and corner to confirm consistent coverage.
With the membrane in place, the dimpled board goes up next. The dimples face inward toward the wall, while the flat side faces the soil. Sheets are overlapped and fixed near the top of the foundation with fasteners suited to concrete. This layer protects the membrane and forms the drainage space that carries water down to the footing drains.
At the top of the wall, a metal termination bar clamps the upper edges of the membrane and drainage board. Installers screw this bar into the concrete, then run a continuous bead of elastomeric sealant along the top edge to close any small gaps. Another bead can be placed where the membrane meets the footing to finish the seal. These finishing touches keep surface water from sneaking behind the system and are one of the small details that separate a quick patch from a long-lasting basement wall sealing job.
Block foundations need extra care when planning how to waterproof a concrete foundation. Concrete blocks are more porous than poured walls, and the mortar joints between them can dry out and crumble. Many older homes also have hollow block cores, which can quietly fill with water if the outside face is not protected.
Water in block walls does not just move straight through. It can travel sideways through joints and from block to block. Once it enters the hollow cores, it can sit for long periods. That constant dampness speeds up mortar damage and can show up inside as peeling paint, white mineral deposits, and dark lines along the joints.
For all these reasons, exterior work is especially important when owners want to waterproof concrete block foundation walls. Repointing weak joints weak joints comes first, along with stabilizing any loose or cracked sections. Then an exterior membrane and drainage system keep water out of the blocks in the first place. In some older or heavily damaged block foundations, Atlantic Brick and Stone may also recommend targeted interior measures to relieve pressure. Their team has wide experience with both newer block homes and historic buildings around Fredericton.
Waterproof membranes do the blocking work, but drainage systems do the moving work. Without drainage, water would sit at the base of the wall and press constantly against it, no matter how good the membrane is. That pressure slowly finds weak spots. Good foundation drainage keeps water moving away from your home so the rest of the system can do its job.
3 key parts of a modern weeping tile or French drain system include the following.
During exterior foundation waterproofing work, Atlantic Brick and Stone checks existing drains, clears blockages where possible, and replaces crushed or clogged sections. This paired approach gives homeowners both basement moisture prevention and long-term control over groundwater near the foundation.
Once the new system is in place, how the trench is filled back in has a big impact on its lifespan. Careless backfilling with large rocks or hard clay can scrape or puncture both membrane and drainage board. Heavy equipment parked too close to the wall can also put more pressure on the system than it was meant to handle.
To protect the wall, crews usually start with a layer of clear gravel over the weeping tile, then lighter material against the drainage board. In rocky or stiff clay soils, they may place a band of clean sand or rigid insulation panels against the wall before adding native soil. Backfill goes in stages, with moderate compaction, instead of one deep, heavy drop from above.
Final grading around the home is just as important. The soil should slope away from the foundation by at least about two centimetres per metre for several metres. Downspouts need extensions so roof water lands well away from the wall. Window wells should have gravel at the bottom and, where possible, a drain that ties into the foundation drainage. Atlantic Brick and Stone pays close attention to these last steps and offers guidance so future landscaping work does not undo a good waterproofing job.
There are parts of basement moisture control that a handy owner can look after. These smaller tasks often reduce minor dampness and can buy time while planning larger work, such as:
Full exterior work is different. Excavation to footing depth is heavy and risky, especially beside an existing house. Trench walls can collapse without warning, and hitting a buried gas or power line can be far worse than a wet basement. Correct waterproofing also calls for specialized primers, membranes, and drainage components that are rarely found at big-box stores, along with knowledge of local soil behaviour and frost depth.
Professional crews bring training, safety practices, and the right tools for each step, from surface preparation and foundation crack repair to membrane detailing and sump pump discharge routing. They also understand building code requirements and how different basement waterproofing methods fit with Fredericton’s climate. When owners ask about foundation waterproofing cost, much of that price covers this skill and the time needed to do careful work.
Atlantic Brick and Stone has more than 15 years of experience in the region and holds certification as a Foundation Repair Specialist. Their team uses thermal imaging and other diagnostic tools to find the true source of moisture, not just the symptoms. They offer clear, written estimates and inspections without pressure. For most homes, that level of planning and execution is far more effective than attempting to waterproof a concrete foundation as a do-it-yourself project.
A dry, healthy basement is not just about comfort. It is about protecting the structure of a home, the air that family members breathe, and the value of what is often a household’s largest investment. Learning how to waterproof a concrete foundation shows how many parts work together, from exterior membranes and drainage boards to footing drains, sump pumps, and careful grading.
In Fredericton and nearby communities, where long winters and wet springs put concrete and block under constant stress, exterior foundation waterproofing paired with proper drainage gives the most reliable protection. The work is detailed and involves excavation, but it often prevents far more expensive problems such as major structural repairs, mould removal, and ruined interior finishes.
Foundations older than about 25 years, especially those with no record of previous waterproofing, benefit from a professional assessment. Atlantic Brick and Stone brings certified expertise, local experience, and both preventative and repair services for poured concrete and block foundations. Their use of thermal imaging and careful inspection helps catch small issues before they show up as visible water in the basement. Instead of waiting for a serious leak, homeowners can contact Atlantic Brick and Stone for a straightforward foundation inspection and a clear plan to keep their basements dry for decades.
A professionally installed exterior system with quality materials often lasts 25 to 30 years or longer. Service life depends on how well the wall was prepared, how carefully seams and corners were treated, and how good the surrounding drainage is. Soil conditions and freeze–thaw cycles also have an effect, because they change how much movement and pressure the system sees. Self-adhered sheets and well-applied liquid membranes have shown excellent durability when handled properly. Atlantic Brick and Stone uses commercial-grade products designed for long service, and they remind clients that interior parts such as sump pumps still need regular checks and testing.
Interior work can manage certain problems, especially small leaks or damp patches on walls. Interior foundation waterproofing often uses a perimeter drain installed along the inside of the footing, connected to a sump pump that collects and discharges water. Interior wall coatings can help control minor seepage and reduce surface dampness in unfinished basements. These methods do not stop water from entering the concrete or block itself, so they do not reduce hydrostatic pressure outside the wall. They are often chosen where exterior access is blocked by property lines, decks, or additions, or where budget makes exterior work hard in the short term. For long-term protection and for finished living spaces, Atlantic Brick and Stone usually recommends exterior systems, sometimes combined with interior drains for extra backup.
The basic idea is similar for both wall types, since both need a membrane and a drain to stay dry. Poured concrete tends to be denser and has fewer joints, so the main focus is on shrinkage cracks and form-tie holes. Block foundations are more open to water, because each block and mortar joint can let moisture pass. Hollow cores inside the blocks can also fill and hold water. Extra steps such as repointing joints and reinforcing weak sections are common before installing a membrane on a waterproof concrete block foundation. Atlantic Brick and Stone works with both kinds of walls and pays special attention to older block foundations that have been through many winters.
A single small crack with no sign of dampness may only need localized repair and monitoring. When several warning signs show up together, it is time to look at full basement waterproofing methods instead of simple patching. Watch for:
Homes with foundations older than about 25 years, especially in neighbourhoods with known drainage issues, should be checked even if there is no standing water yet. Atlantic Brick and Stone offers inspections with thermal imaging that can reveal hidden moisture behind finishes, which helps owners choose between focused crack repair and full exterior foundation waterproofing.
GET STARTED
Create stunning structures with our residential and commercial masonry services in Fredericton. From meticulous designs to the completed build, our process is professional and rewarding, and we can’t wait to build your dream with you.
Atlantic Brick and Stone, one of the best masonry contractors in Fredericton, NB
Contact
8 Muskie Street, Lower Kingsclear, New Brunswick E3E 0E7, Canada