
Does your factory-built fireplace look plain or outdated in your living room? Are you worried that heavy masonry finishes will overwhelm your wall framing? Many homeowners ask if stone veneer can be installed around a prefabricated fireplace without causing safety issues.
Yes, lightweight stone veneer can be installed safely around a prefabricated zero clearance fireplace. The process requires replacing paper-backed drywall with non-combustible cement backer board, installing metal lath, and applying a scored scratch coat mortar layer. Homeowners in Fredericton can turn to professionals like Atlantic Brick and Stone to upgrade outdated surrounds with durable materials.
This guide explains clearance rules, wall preparation steps, and setting techniques for manufactured cladding. Following correct masonry steps protects your home while creating an attractive central hearth feature. Learning these fundamental principles helps you plan a safe fireplace refacing project.
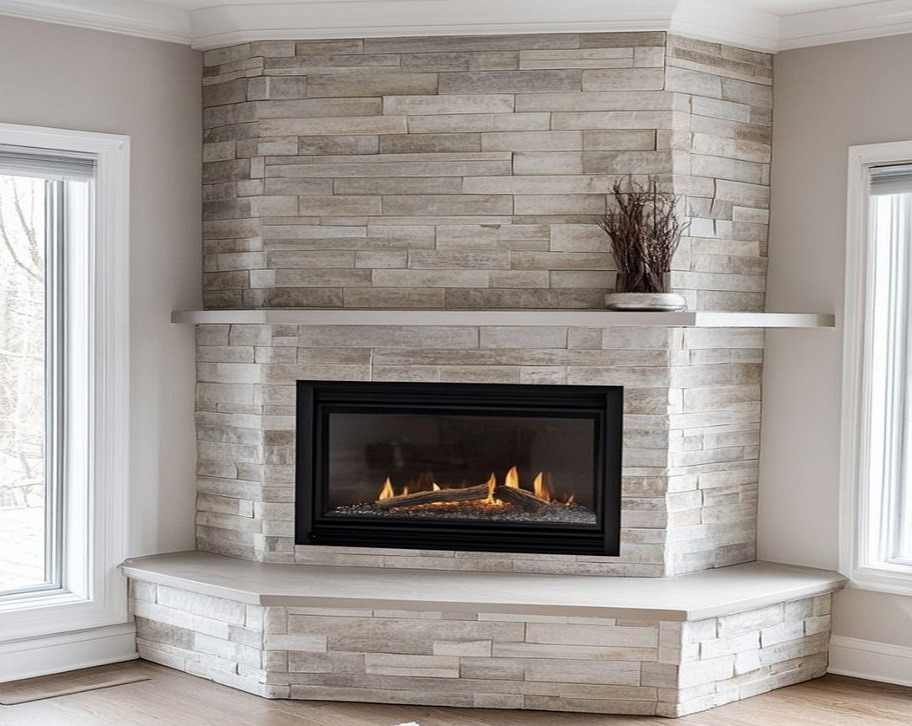
Yes, you can put stone veneer around a prefabricated fireplace because factory-built metal boxes distribute heat safely through insulated outer walls. Lightweight stone cladding attaches to surrounding wall studs without needing concrete floor footings.
Installing stone veneer around a prefabricated fireplace is safe and practical for residential spaces. Factory-built metal fireboxes keep exterior surfaces cooler than traditional site-built masonry systems. Lightweight cladding attaches to surrounding wall framing without adding excess dead weight to your floor structure.
Prefabricated units rely on engineered air spaces or multi-walled metal jackets to vent heat safely. Because manufactured stone products weigh under 73 kilograms per square metre, standard wall studs hold the assembly easily. Mortar bonds directly to structural backing board rather than metal firebox plates that expand during heat cycles. Proper installation creates an attractive focal point while keeping the entire structure fire safe.
Zero clearance fireplace units sit directly against interior wall framing without requiring traditional brick chimneys or thick concrete hearth bases. Factory-built steel enclosures isolate combustion heat so nearby wood or metal studs stay within safe temperature limits. Mortar and stone cladding must anchor securely to surrounding backer boards rather than sticking directly to metal faceplates. Metal housings expand and contract during heat cycles, which breaks direct mortar bonds over time.
Manufactured stone veneer is cast from high-density concrete mixes inside natural stone moulds for consistent shape and lower cost. Flat rear surfaces make manufactured pieces easier to set in mortar beds against wall backer boards. Thin natural stone veneer is sliced from real quarried granite or slate to offer authentic organic texture and permanent colour retention. Both options withstand high temperatures near fireplace openings when installed over proper non-combustible substrates.
Safety clearances and wall prep for zero clearance fireplaces require strict compliance with manufacturer installation manuals and local building codes. Non-combustible cement backer board and metal lath must replace standard drywall to prevent thermal degradation.
Building codes across New Brunswick require exact adherence to manufacturer instructions for fireplace clearance zones. Installing stone veneer requires replacing standard paper-faced drywall with non-combustible cement backer board near the firebox opening. Standard drywall paper can char or delaminate when exposed to continuous heat cycles and wet mortar moisture. Using cementitious panels creates a rigid foundation that supports masonry mortar coats without flexing.
Clearance rules protect combustible wall materials like wood framing and timber mantels from extreme radiant heat. Wooden mantels must meet height guidelines based on how far the shelf projects out from the finished wall surface. Stone veneer can surround the outer metal trim, but it must never cover louvres, glass latches, or control panels. Leaving convection vents open permits proper air circulation and allows technicians to service inner controls easily.
Substrate preparation begins by removing drywall and fastening 12.7 mm cement backer board to wall studs with cement board screws. Installers then attach galvanized diamond metal lath over the cement board to form a strong mechanical grid. Spreading a 10 mm layer of polymer-modified Type S mortar over the lath creates a scored scratch coat. Scoring horizontal grooves in the wet scratch coat gives setting mortar a firm keyway to grip during stone placement.
|
Substrate material |
Heat resistance |
Mortar adhesion |
Building code approval |
|---|---|---|---|
|
Standard Gypsum Drywall |
Poor with paper backing that chars |
Low due to paper layer delamination |
Not approved near firebox openings |
|
Cement Backer Board |
High non-combustible rating |
Medium requiring lath for heavy stone |
Approved for surrounding clearance zones |
|
Cement Board + Lath + Scratch Coat |
High non-combustible rating |
High with strong mechanical lock |
Approved industry gold standard |
Installing stone veneer around a factory-built firebox involves dry-fitting pieces, back-buttering each stone with Type S mortar, and setting courses from the bottom upward. Proper layout and mortar application prevent hollow voids and produce a clean finish.
Installing stone veneer around a factory-built firebox requires careful planning before applying wet mortar to the wall surface. Laying out several boxes of stone on the floor helps blend colours, shapes, and surface textures evenly. Staggering vertical joint lines prevents noticeable seam patterns across the finished fireplace surround. Working methodically from the base upward keeps lower stones supporting upper courses as the mortar cures.
Setting stone veneer with the back-butter mortar method ensures total contact between the stone and the mortar scratch coat. Masons apply a generous mortar layer to the back of each piece before pressing it firmly into place. This technique squeezes out trapped air pockets and forms a durable bond across the entire surround wall.
Lightly mist the cured mortar scratch coat and the back of each dry stone piece with clean water using a spray bottle or sponge. Dampening porous concrete surfaces prevents them from pulling moisture out of fresh setting mortar too quickly. Proper moisture control keeps the mortar bond strong during its initial cure phase.
Mix polymer-modified Type S masonry mortar with clean water until it reaches a smooth, workable consistency similar to thick peanut butter. Let the wet mortar slake for 5 minutes before stirring it again to activate bonding agents. Using rich mortar guarantees strong adhesion against ambient fireplace heat.
Install corner stone pieces at the bottom edges while alternating long and short legs as you move upward. Starting at the outer corners establishes clean vertical edges and provides firm support for flat field stones. Checking corner alignment with a spirit level maintains neat horizontal courses across the face.
Apply a full 12.7 mm layer of mixed mortar across the entire rear surface of each field stone piece using a trowel. Press the stone firmly against the scratch coat while applying a slight twisting motion until mortar squeezes out along the edges. Complete mortar coverage prevents hollow gaps where heat or moisture could collect.
Place stones from the bottom of the surround upward while checking alignment with a spirit level periodically. Maintain consistent joint gaps between pieces if you plan to fill joints with grout later. Gravity helps hold each row steady while the mortar sets firmly against the wall.
Fitting stone veneer around metal firebox faceplates requires precise cuts using masonry cutting tools. Installers use wet tile saws or angle grinders with diamond blades to trim stones cleanly around outer metal flanges. Chipping cut edges slightly with masonry pliers softens hard mechanical lines so trimmed pieces match natural stone textures. Leaving space around access doors or air intake vents ensures your fireplace operates safely without overheating internal components.
Caring for your new manufactured stone fireplace surround involves allowing full mortar cure times, applying breathable sealants, and performing gentle cleaning. Proper maintenance protects concrete pigments and keeps mortar joints solid for decades.
Freshly installed mortar needs time to cure completely before exposed surfaces experience high heat cycles from fireplace operation. Rapid heat buildup in damp mortar traps steam inside concrete structures, which causes cracking or stone detachment. Following basic maintenance steps preserves the natural appearance of manufactured stone and protects mortar joints against soot stains.
Wait 72 hours before operating gas or electric units and wait 7 to 10 days before lighting wood fires. Curing time allows setting mortar to reach full structural strength without thermal shock. Running fireplaces too soon causes moisture trapped in mortar beds to expand rapidly and crack stone bonds.
Vacuum stone surfaces monthly using a soft brush attachment to remove airborne dust and loose debris. Soft bristles clear dust out of deep stone textures without scratching concrete pigments. Keeping surfaces clean prevents household dirt from settling into porous masonry face details over time.
Wash dirty areas or soot marks using warm water mixed with a mild pH-neutral soap. Scrub gently with a soft nylon brush and blot the surface dry using clean towels. Avoid using wire brushes, bleach, or harsh acid cleaners because chemical agents strip surface pigments and degrade mortar joints.
Apply a breathable silane or siloxane masonry sealer every 3 to 5 years after the initial mortar cure period finishes. Penetrating sealants protect stone faces from soot staining and moisture without trapping water vapour behind the finish. Non-film-forming sealants preserve natural matte textures while making routine dusting easier.
Professional masonry services by Atlantic Brick and Stone deliver safe, code-compliant stone veneer installations for homeowners across Fredericton. Expert masons evaluate wall substrates, install proper fire-safe backer boards, and fit stone cladding around zero clearance fireboxes.
Achieving a durable stone fireplace surround requires exact clearance measurements, proper substrate preparation, and skilled masonry techniques. The company offers refacing services, material guidance, and code-compliant installations for property owners in Fredericton and nearby communities. Experienced masons evaluate your existing structure, install non-combustible cement backer boards, and apply lightweight stone cladding cleanly. Homeowners can schedule a consultation to discuss project ideas and receive a detailed installation estimate.
Stone veneer provides an attractive, lightweight, and fire-safe finish for prefabricated fireplaces when installed over non-combustible substrates. Following manufacturer clearance guidelines and building code rules guarantees a safe installation that improves your home.
Installing manufactured stone cladding around a zero clearance firebox creates an elegant focal point without requiring heavy floor supports. Success relies on removing paper-faced drywall, securing cement backer board, applying metal lath, and troweling a scored scratch coat mortar layer. Following correct back-butter setting steps and preserving mandatory clearance gaps around vents ensures long-term safety and visual appeal. Proper care and breathable sealants keep your new stone fireplace surround looking exceptional.
Direct installation over standard drywall is not recommended within immediate clearance zones. Moisture from wet mortar softens paper backing, and heat causes paper layers to delaminate over time. Replacing paper-faced drywall with non-combustible cement backer board ensures safe, long-lasting mortar adhesion around firebox openings.
Clearance space depends on your specific fireplace manufacturer manual. Stone veneer and mortar must terminate at the outer metal flange, leaving lower louvres, glass latches, and top convection vents uncovered. Blocking air intake or release vents creates severe fire hazards and voids your fireplace warranty.
Gas fireplaces generally do not require a raised concrete hearth unless specified by the manufacturer manual. Many direct-vent models sit flush with surrounding subflooring. Installing a flat stone or tile hearth extension protects nearby floor coverings from heat and provides balanced visual proportions around the surround.
Total installation costs depend on material selection, surface preparation needs, and overall surround dimensions. Manufactured stone projects cost less than full-bed natural stone because extra floor reinforcement and structural foundation work are unnecessary. Consultations help define accurate project budgets for homeowners.
Yes, applying a non-combustible, breathable penetrating sealer protects stone veneer and mortar joints from soot accumulation, household dust, and accidental liquid spills. Silane sealants allow trapped moisture to escape without changing the natural stone finish or creating a glossy surface film.
GET STARTED
Create stunning structures with our residential and commercial masonry services in Fredericton. From meticulous designs to the completed build, our process is professional and rewarding, and we can’t wait to build your dream with you.
Atlantic Brick and Stone, one of the best masonry contractors in Fredericton, NB
Contact
8 Muskie Street, Lower Kingsclear, New Brunswick E3E 0E7, Canada