
Have you noticed water stains on your ceiling near the chimney? Is there a musty smell in your attic after heavy rain? Discovering water around your chimney can be frustrating, especially when you can’t pinpoint where it’s coming from.
Water infiltration near a chimney originates from two distinct sources: the metal flashing that seals the gap between your roof and chimney, or the chimney masonry itself. While both issues create similar symptoms inside your home, they require completely different repair approaches. Flashing leaks appear immediately during rain and show dampness at the roof-chimney junction, while masonry problems cause delayed dripping hours after rain stops and display white salt deposits on bricks.
This guide will walk you through the specific signs that distinguish flashing failures from masonry problems. You’ll learn how to conduct a simple diagnostic test, understand what each symptom reveals, and know exactly which professional to call. Whether you’re dealing with immediate storm-related leaks or slow moisture damage that appears hours after rain stops, you’ll have the knowledge to identify the source and take action.
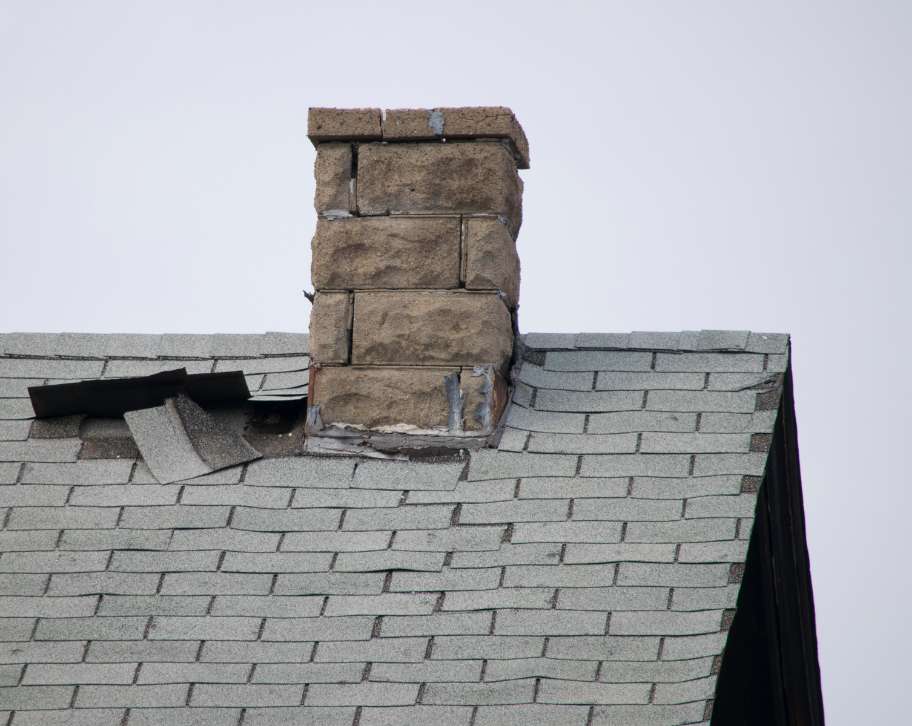
Flashing is the metal barrier (typically galvanized steel, copper, or aluminum) that creates a watertight seal where your vertical chimney meets your sloped roof. Because these two structures expand and contract independently with temperature changes, the flashing joint is one of the most vulnerable points on your entire roof system.
When flashing fails, water bypasses the chimney masonry entirely and enters your home at the roof-chimney junction. The symptoms appear quickly and in specific locations.
Location-based indicators are your first clue. If you see ceiling stains or bubbling paint directly adjacent to the chimney (not inside the firebox), the flashing is likely compromised. Check your attic after a rainstorm. Dampness on the wooden rafters or roof decking where the chimney passes through points directly to flashing failure. You might also notice water trickling behind the drywall of the chimney breast rather than inside the flue itself.
Timing matters significantly. Flashing leaks typically manifest immediately during heavy rain. If water appears within minutes of a downpour starting, you’re almost certainly dealing with a flashing issue rather than masonry saturation.
Physical inspection reveals specific deterioration patterns:
Rust and corrosion eat through galvanized flashing over time, creating pinholes that allow water penetration
Separation gaps between the metal and brick indicate the sealant has dried out or the “reglet” (the groove where metal tucks into brick) has pulled away
Missing or cracked caulking along the top edge where flashing meets masonry creates an open pathway for water
Improper installation is surprisingly common; single-layer flat flashing instead of proper step-and-counter flashing systems fails to create a true watertight barrier
On the uphill side of your chimney, look for debris accumulation. Leaves and pine needles trapped behind the chimney create a dam that forces water to back up under shingles and flashing. A properly installed cricket or saddle (a small peaked structure) should divert water around the chimney, but many older homes lack this feature entirely.
When the chimney structure itself is the water source, you’re dealing with an entirely different problem. Brick and mortar are naturally porous materials. During prolonged rain, they absorb water like a sponge until reaching saturation point, then release that moisture into your home’s interior.
The “sponge effect” is the primary mechanism of masonry leaks. Unlike flashing failures that produce immediate leaks, saturated masonry often continues dripping for hours or even a full day after rain stops. This delayed timing is a key diagnostic indicator.
Efflorescence provides definitive proof of masonry water absorption. This white, powdery substance appears on brick surfaces when water penetrates the masonry, dissolves internal salts, and deposits them on the surface as it evaporates. If you see white staining on your chimney’s exterior, water is absolutely entering through the brickwork.
Spalling bricks signal advanced freeze-thaw damage. When water enters brick pores and freezes, it expands with tremendous force, causing the brick face to flake, peel, or pop off entirely. This deterioration accelerates rapidly once it starts, particularly in climates with repeated freezing and thawing cycles.
The chimney crown deserves special attention. This concrete cap at the very top of your chimney protects the masonry below. Even hairline cracks in the crown allow water to travel down the interior of the chimney structure. If you find water dripping directly into your firebox or pooling on the fireplace floor, the crown is likely compromised. A rusted fireplace damper confirms that water is entering from the top rather than through flashing.
Mortar joint deterioration creates obvious entry points. Examine the mortar between bricks. If it’s crumbly, recessed more than a quarter-inch, or missing entirely, wind-driven rain will push water into the wall cavity. This condition requires repointing (removing old mortar and replacing it with fresh material) to restore the chimney’s water resistance.
For prefabricated or wood-framed chimneys, check the metal “chase top” that covers the structure. If this pan is concave (bowed inward), it collects standing water that eventually rusts through the metal, dumping large volumes directly into the chimney.
|
Factor |
Flashing leak |
Masonry leak |
|---|---|---|
|
Leak timing |
Immediate during rain |
Delayed hours after rain stops |
|
Water location |
Attic rafters, ceiling near chimney base |
Inside firebox, down chimney walls |
|
Visual signs |
Rust, gaps, separated metal |
White powder, crumbling mortar, spalling bricks |
|
Repair specialist |
Roofing professional |
Masonry specialist |
|
Common causes |
Corroded metal, poor installation, missing sealant |
Cracked crown, deteriorated mortar, porous bricks |
When visual inspection doesn’t provide a clear answer, a controlled water test isolates the exact entry point. This “live leak test” uses a garden hose to simulate rain in specific zones while someone monitors the interior for leaks.
Preparation is needed. Conduct this test on a completely dry day, ideally after several days without rain. You need two people: one on the roof with the hose, one inside watching for water. Have towels ready and clear the area beneath the chimney to avoid damage.
Stage one targets the flashing. Start at the base where the chimney meets the roof. Spray only the flashing and the shingles immediately surrounding it for 15 to 20 minutes. Use moderate water pressure, not a heavy stream. If water appears inside during this stage, you’ve confirmed flashing failure.
Stage two tests the masonry. If no leak appeared during stage one, move the spray up to the mid-section of the chimney. Soak the brickwork thoroughly for another 15 to 20 minutes. If water takes time to appear (10+ minutes of continuous spraying), you’re witnessing the “sponge effect” of masonry saturation. This delayed response confirms the brick and mortar are absorbing water and releasing it into the interior.
Stage three examines the crown and cap. Spray the very top of the chimney, including the crown and cap. If water appears in the firebox or drips down the flue, the crown has cracks or the cap is missing or damaged.
Document your findings carefully. Note which stage produced leaks and how long it took for water to appear. This information helps professionals diagnose the problem accurately and recommend the correct repair.
Safety tip: If your roof is steep, the chimney is tall, or weather conditions are questionable, skip the DIY test and call a professional for assessment. Trained specialists have the equipment and experience to conduct thorough leak diagnosis safely.
Knowing which specialist handles each type of repair prevents delays and ensures the work is done correctly the first time.
Call a roofing professional when the problem involves the flashing system or surrounding roof materials. Roofers handle flashing replacement, shingle repairs around the chimney base, and installation of crickets or saddles to divert water. If your leak appeared immediately during rain and testing confirmed flashing failure, a roofer is your first call.
Call a masonry specialist when the chimney structure itself is compromised. Masonry experts handle repointing deteriorated mortar joints, repairing cracked chimney crowns, restoring spalling bricks, and applying professional-grade waterproofing treatments. If you see efflorescence, crumbling mortar, or water dripping inside the firebox, masonry expertise is required.
Some situations require coordination between both trades. For example, if both the flashing and the crown are damaged, the masonry repairs should be completed first, then the flashing replaced.
Yes, absolutely. Water infiltration leads to rot in wooden roof framing, mold growth in attic spaces, and progressive deterioration of masonry that can compromise the chimney’s structural stability. Early detection and repair prevent these expensive consequences.
Costs vary based on chimney size, flashing material choice, and damage extent. Minor resealing might cost a few hundred dollars, while complete flashing replacement can reach several thousand. Professional inspections provide detailed estimates after thorough assessment.
Summer offers optimal conditions. Dry, warm weather ensures sealants bond properly and roofwork proceeds safely. Spring and fall work well too, but avoid winter when freezing temperatures compromise material performance.
Inspect at minimum twice annually (spring and fall) and after major storms. Catching small flashing gaps or early mortar deterioration before freeze-thaw cycles cause expansion saves significant repair costs.
While waterproofing products are available, DIY application risks improper product selection or applying sealant over unrepaired damage. Professional assessment ensures underlying crown cracks and mortar failures are addressed first, then breathable, vapor-permeable sealants are applied correctly.
GET STARTED
Create stunning structures with our residential and commercial masonry services in Fredericton. From meticulous designs to the completed build, our process is professional and rewarding, and we can’t wait to build your dream with you.
Atlantic Brick and Stone, one of the best masonry contractors in Fredericton, NB
Contact
8 Muskie Street, Lower Kingsclear, New Brunswick E3E 0E7, Canada