Effective Ways to Repair Concrete Spalling
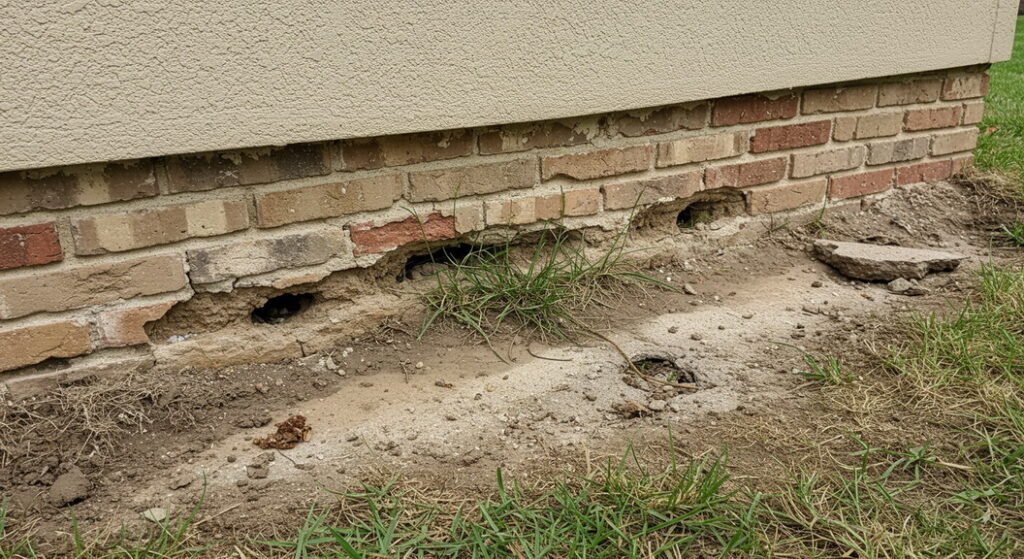
Effective Ways to Repair Concrete Spalling Have you noticed your concrete surfaces starting to chip, flake, or crumble away? That’s concrete spalling – a common but a serious issue that can affect your driveways, patios, foundations, and more. You are facing a problem that goes beyond mere cosmetic concerns; spalling concrete signals underlying structural issues that need your attention right away. When your concrete starts to spall, it’s not just unsightly – it’s the beginning of a downward spiral that can lead to extensive damage if you leave it untreated. But dont worry, you can tackle concrete spalling with the right techniques and materials. Throughout this guide, you will discover practical, effective methods to repair your spalled concrete and extend the life of your concrete structures. Brief intro of concrete spalling Concrete spalling is the deterioration and breaking off of a concrete surface, often revealing the reinforcement steel beneath. It occurs when moisture penetrates the concrete, causing the steel to rust and expand, leading to cracks and pieces breaking away. You should worry about concrete spalling when: Large pieces are falling off Reinforcement steel is visible Multiple cracks appear and grow The affected area is structural (columns, beams, or load-bearing walls) Common causes include: Poor water drainage Freeze-thaw cycles Chemical exposure Inadequate concrete cover over reinforcement Early signs of spalling: Surface flaking Small cracks Rust stains Bubbling or peeling concrete surface Early detection and repair are important to prevent structural damage and expensive repairs. How to fix spalled concrete? Cleaning and preparation spalled concrete repair requires thorough preparation, much like setting a broken bone requires proper alignment before healing can begin. You need to thoroughly clean the affected area before you can make any meaningful repairs. Start by removing all loose or deteriorated concrete from the spalled area. You can use a chisel and hammer for smaller areas or a demolition hammer for larger sections. Don’t be timid here – any weak concrete that remains will just cause you problems later. You want to expose solid, stable concrete that can form a strong bond with your repair materials. Once you have removed the loose concrete, it’s time to clean the surface. Use a wire brush to scrub away dirt, dust, and any small particles. For stubborn stains or contaminants, a pressure washer works wonders to clean your concrete surface thoroughly. After cleaning, allow your concrete to dry completely. Moisture trapped within the concrete can compromise your repair efforts and potentially lead to spalling again in the future. If you’re in a hurry, you can use a heat gun or fan to speed up the drying process, but don’t skip this crucial step. The final preparation step involves checking for any cracks that might extend beyond the spalled area. These cracks can allow water to penetrate and expand during a freeze-thaw cycle, potentially causing more spalling in your concrete. Mark these areas so you can address them during your repair. Applying a bonding agent A bonding agent serves as the super glue between your old and new concrete. This critical step creates a strong connection between your existing concrete and whatever repair material you choose to apply. Before applying the bonding agent, make sure your concrete surface is not only clean but also slightly rough. This texture gives the bonding agent more surface area to grip onto. You can roughen smooth concrete using a wire brush or even by lightly chiseling the surface. When selecting a bonding agent, you have several options. Polymer-modified bonding agents are popular because they improve adhesion and flexibility. These specially formulated products penetrate deep into your concrete pores to create a strong mechanical bond. To apply the bonding agent: Mix according to the manufacturer’s instructions – precision matters here Use a clean brush to work the agent into your concrete surface Make sure to cover the entire repair area including any exposed rebar Allow the agent to become tacky (but not fully dry) before applying repair materials Many DIYers make the mistake of letting the bonding agent dry completely. For most products, you want to apply your repair material while the bonding agent is still sticky to touch – this creates the strongest connection between the layers and helps prevent future spalling. Remember, different bonding agents have different working times. Read the instructions carefully so you don’t miss your window of opportunity for the best adhesion. Repair material application Choosing the right repair material makes all the difference between a fix that lasts several years and one that fails within months. Your selection depends on the severity of the spalling and the specific conditions your concrete faces. For minor spalling where the damage is primarily superficial, you might opt for a concrete patching compound. These pre-mixed products contain cement, sand, and special polymers that enhance durability and adhesion. To apply: Mix the patching compound according to package directions Apply the mixture to your prepared area using a trowel Press firmly to remove air pockets that could weaken your repair Feather the edges to blend with the surrounding concrete surface When dealing with larger areas of spalling concrete, consider using a concrete resurfacer. This thin layer of new concrete can restore the appearance and function of your moderately damaged surfaces. Apply it at least 1/8 inch thick to ensure adequate strength. For deeper spalling where the damage extends to the rebar, you will need a structural repair mortar. These specialized concrete mixes contain extra reinforcing fibers and can withstand greater internal pressure without cracking. If you notice thin cracks running through or near the spalled areas, epoxy injection might be necessary before applying your main repair material. The epoxy seals the crack from within, preventing water from penetrating and causing future freeze damage. When mixing your concrete repair materials, be precise with your water ratios. Too much water weakens the mix and can lead to more spalling down the road. Too little makes the material difficult for you to work with and may prevent proper bonding.